Strip Planking With Epoxy and Less Than Ideal Wood

Ted Moores is a renowned boat builder, author and teacher whose name is synonymous with stripper canoes. He and his partner Joan Barrett own Bear Mountain Boats in Peterborough, Ontario. This is the first of a series of articles by Ted Moores on lessons learned from building his 30' Electric Hybrid Launch Sparks which incorporated the knowledge gained from 35 years of wood/epoxy boatbuilding. Pay attention kids.
Sparks is a science project. A professional builder working for a client has the responsibility of delivering the boat on time and budget with no surprises so we generally stick to what worked last time. But as a science project, questioning the way things are usually done, pushing the limits of the materials and then taking the responsibility becomes the objective. Because failure is anticipated with any experiment, testing is an important part of the project and has been a whole lot of fun with few surprises, mostly pleasant.
In this series, we will take a look at some of these questions and how we have used WEST SYSTEM® Epoxy to utilize less than ideal wood and look at ways of building boats with wood that will be low maintenance and age gracefully. Since working safe with epoxy has allowed me to have a long career using it, you will hear a lot about safety.
Planking Sparks
When we look at the future of wooden boatbuilding, the major limiting factor will be the availability of suitable wood. We won’t stop building wooden boats so the challenge is to make the best of, and perhaps improve on, what we have to work with.
Strip-plank/epoxy is the ideal technique for planking Sparks. It adapted well to the complex fantail hull shape, could utilize local white cedar and we have been experimenting with the technique for about 35 years.
The most liberating feature of this building method is that the wood is simply a core material. The wood fibers do contribute to stiffness but the basic purpose of the core is to maintain consistent space between the two fiberglass/epoxy layers. When we look at it this way, the core can be anything as long as the glass/epoxy will bond to it and it is dense enough not to cave in under the anticipated compression load and be good in shear. Because the moisture content of the wood will not change and air is excluded, traditional planking characteristics such as rot resistance are not an issue.
Finger Joints
With this principle in mind, making long planks out of short boards did not require a structural joint; this suggested easy to machine finger-joints as an attractive option. A few simple experiments and destructive tests proved the joint to be more than satisfactory.
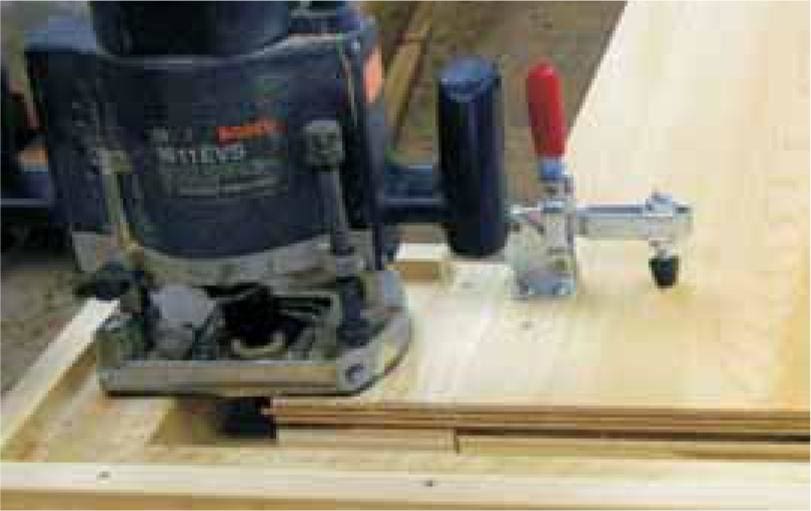
 Above: To machine the joint, we built a simple router setup that would shape the ends of two boards in one pass. One board is flipped over to fit the ends together.
 Above: The key to a joint that did not fail was to saturate the end grain with mixed un-thickened epoxy until it stayed shiny, followed by a thin coat of epoxy thickened with 403 Microfibers. Drawing the joint together straight and tight was also critical.
Traditionally, the accepted shape for strip planks has been square in section. I assume this began with edge-nailing dry joints on a hull that would be painted. This makes sense because it is easier to keep short nails centered in both planks and the narrow width minimized the amount each joint would expand and contract. Since our planks will be edge-glued and not move against each other, does it matter how wide the planks will be? Our choice was based on the maximum width that would handle the bends dry and yet be the best cut from the available raw wood.
Sparks planking is 3⁄4" thick × 2 3⁄4" wide eastern white cedar dried slowly in a simple dehumidifier kiln to 6% moisture content then allowed to stabilized in the shop at about 8%. We finger-jointed 8'–10' long 1" × 6" planks together to make full-length planks 32' to 38' long. Then we dressed them to clean up the glue joint, split them into two planks and machined a half radii bead and cove on the edges. Planking the hull went fast using full-length planks; it was easy to stagger the joints and the lines stayed fair.
 Above: We planked the hull over a laminated Douglas fir stem, keelson and sheer clamp. The sheer clamp, which extends around the fantail, is covered with plastic tape to keep the planks from sticking to it. After sanding and applying the glass/epoxy to the inside of the hull, we glued the sheer clamp back in over top of the glass. This avoided all the time and complication of fitting the glass around the sheer clamp and creating a theoretical weak area in the most vulnerable part of the hull.
 Above: We began planking about half way between the sheer and keel where the plank would lay in the most relaxed position at both stem and fantail. This split the difference that comes with using parallel planks on a shape that is wider in the middle. This way the edge-set, or sideways bending, in the planks was not extreme at the centerline or the sheer. Once started, we proceeded to plank in both directions at the same time.
 Above: Most of the pressure holding the plank to the mold and edge to edge is controlled with simple jigs and wedges. The ‘C’ shaped plywood jig has two screws that protrude slightly through the plywood. When pressure is applied with the small clamps, the end of the screws bite into the mold to keep it from twisting when pressure is applied by the wedges. Made from scrap wood, the tooling cost is low, they apply controlled clamping pressure where it is needed and they are fast to setup and reset.
We applied mixed 105 Resin®/207 Special Clear HardenerTMthickened with 403 Microfibersto the cove with an acid brush. While there are more aggressive ways of getting the glue onto the plank, the acid brush puts just the right amount of glue in the right place. The cure speed of the 105/207 was ideal as it allowed sufficient working time to position clamps yet was fast enough to glue up two sets a day.

